


TeyKey1
-
Content Count
394 -
Joined
-
Last visited
-
Days Won
51
Posts posted by TeyKey1
-
-
Damn that's some serious L2P issues there
 But I've seen plenty of people like him and somehow they don't loose any motivation by loosing all the time.
-
26 minutes ago, Haswell said:I did notice that it has extremely high good camo and view range, and you get Designate Target for getting more assist damage. I guess pure vision control is another way to play it?
Yes you won't get to the dmg output of Termis and autocannons in general. It's as well hard to keep up with a good LT or TD player. But camo and viewrange are quite good so I try to rely on those to compensate the "lack" of damage. Don't get me wrong, it can do quite some damage but there are clearly better options in this regard.
Additionally you have to exploit bot dumbness as often as possible. Eg. shooting stationary targets and so on. I think it can work on open maps if you have a decent MBT that tanks the damage while you try to keep behind it and dump your salvos.
Currently it feels like a very good spotter with a rather gimmicky weapon system that requires some brain to use without getting killed. It's not trash at all in my opinion but it could benefit from a faster reload in PVE I think.As well the performance depends heavily on the team. If there are enough idiots who camp you can farm all the spot damage and do damage along the way, while having a good team on the other hand doing this can become hard/impossible.
-
I made a video of some PVE gameplay with the Pindad.
Most testers currently think it is shit for PVE. In my opnion it's actually quite good. It could use some faster reload but other than that it's unique to play. Not easy to master but actually fun to play because it requires some thinking to work.
-
C13TUA>>NM142 in a PVP pov
It's simply better in my opinion. I never really liked the NM. It's an ok vehicle but I definitely prefer the wiesel 1 HOT or the VBL INGWE over it. Top-Down ATGM are rather a gimmick and usually not too useful. If you know what you're doing you're usually better off with the normal ones.
-
Ok so I think I get it now:
Tree falls into Bush and overlaps with it. --> Bush provides double the bush-camo and then gets processed further for camo-calculation. Whereas nowadays a fallen tree just counts as another bush in the LOS.
Hard to tell what difference it makes actually without knowing the calculations.
If it's not too much I guess it'll have little impact on gameplay. Experienced players should be able to profit from it without gaining a massive advantage.
So in my books this should be fine, only take into account that I have no clue how the calculations are done.
-
I'm a bit lost now:
According to this:
https://aw.my.games/en/about/game-guides/spotting-and-camouflage
QuoteTree canopies work much like bushes but only the part with leaves is taken into account. When you stand under a tall tree with a large crown, it will not help your camouflage in the slightest. But if you stand on the same level as the tree canopy so that it is positioned between you and the enemy, it will work much like a bush. Fallen trees also work like improvised bushes.
It already works like that I suppose. And this is as well the case according to my knowledge.
In this case just leave it as it is. If it is not the case I think it's something that can get added. However, I think there should be a hard cap of only 1 tree counting as extra camo. Otherwise it gets out of hand. In a PVP point of view I don't see any problem with this as long as you can't stack it to exorbitant values.
-
So it's basically a 5*T15 contest I guess? Or is there even a better combination?
-
Yes definitely a step in the right direction!
-
Please note as well that the game is confusing max-spread with min-spread quite often. If you happen to skill max-spread and the accuracy of your gun increases in the info tab the game probably confused max- with min-spread
-
Hello and Welcome

Steam and My.games accounts are completely separate. If you started off with the my.games account the progress won't be transferred to your steam account. In other words you start from zero.
As I'm not a steam player I don't know how daily rewards work there.
-
Does there happen to be a post-size limit? @BumbaX If yes then it would have been definitely better. I'll see what I can do about it, when I hit the limit.
@Qbicle Yes I already stumbeld across this one aswell. All that I know is that normalization was removed in Update 0.16 AFAIK, because it produced unexpected behaviour along with the overmatch mechanics. Then it seems like they reimplemented it according to the quoted article. I guess I have to ask if this is still valid. I personaly was more tending towards "not valid anymore" but I could definitely be wrong.
-
12 hours ago, Katsumoto said:I'd be willing to say that this is a pretty safe bet for now unless we can get more information from the dev team.
Yes There is not much information and lost of it is obsolete. I try to test stuff out as far as possible and otherwise rely on my experience.
12 hours ago, Katsumoto said:unless we can get more information from the dev team
For stuff I can't figure out myself I try to ask the CMs. If I'm lucky they can give me useful information sometimes. But it's definitely not guranteed.
12 hours ago, Katsumoto said:I recall that someone said that HESH and HEP work the same as HE minus the changes to account for what they were intended for.
This is what I assume as well. Currently I'm trying to figure out how to interpret the "spall threshold" value. Other than that HE as well as HEP/HESH does not ricochet/fail to fuse at all at least I've never experienced it for a long time and could not replicate the behaviour in tests.
Other than that I have updated the AP section accordingly. The overmatch mechanics seem to still be valid for AP so I added a brief explanation. However, I was not able to find any numbers or equations on that. If anyone knows more than me in this regard, please share. I'll try to test it this evening to make sure.
-
In the my.games launcher settings, you can delete unused gamefiles (mostly patches). Got to settings, then tab "Games and downloads". There you can delete the patches. Regarding the folder, maybe first just copy it to a new location and see if the game still works. If it does you can delete it, otherwise put it back.
A big factor to disk space are as well replay recordings. So you might want to delete those too
-
-
Maybe AW devs already have such thing. But I don't think the data to create a heatmap is acessible.
I'd not see any problems if it would be done but I do not really know what you would use it for? Usually, at least if you're experienced, you know where the enemy is going so there's not really a need for that.
-
For me it's usually that I'm way too agressive in situations I shouldn't. Which usually leads to quick death

Playing agressive is not a bat thing per se. But sometimes it's not the best option.
-
I'm not much of a PVE player because the bots are too predictable and most standard PVE maps are way too easy in my opinion.
But I happen to enjoy Specops T10 way more because there are some more difficult maps when playing with randoms, such as SH ch. 4 or MC ch. 4. Tier 8 and below is a joke in my opinion. The only difficulty is to bring a dpm machine and point and click on red targets.
I played SH ch. 4 T10 two whole evenings with randoos before it got adjusted. I lost like 35 Battles while winning 2. But it was the first time I actually started to enjoy PVE. Winning the missions with randoms actually felt like an accomplishment. In my opinion PVE is simply too easy if you can get winrates of nearly 95-100% while playing with randoms on hardcore. Winning such a mission just doesn't feel like an accomplishment and that's the main reason PVE kind of seems to be frustrating for me as a random player just because it seems to be way too easy if you win all the time with ease. As well as @BumbaX said bots are simply stupid and predictable. The missions and the bot behaviour is not really random and therefore you've simply seen it all pretty quick. This is why I personally prefer PVP. We've got mostly 3 or 4 maps during an evening but most PVP battles are not the same even if they're fought on the same map, simply because humans are way harder to predict than bots.
One PVE mode I really enjoyed as randoo player is Labyrinth on T10. But even this mode could be more difficult in my opinion. But if you happen to loose 2 teammates early on the battle actually starts to become interesting because you need to start using tactics and not just point and click.
But I really like the Specops stuff, it's the only reason I play PVE more or less regularly.
Problem I see with PVE is usually that the difficulty is achieved by only spawning some more bots or give them more HP. So the only thing you need to counter this is a dpm machine. Hence why I actually like maps like SH Ch. 4 with the lasers and bombs that force you to play actively and use your brain. And I hope that future PVE maps will be made more difficult or that they introuce new interesting modes such as Labyrinth.
-
8 hours ago, Katsumoto said:As a point that I just noticed:
- AP rounds have their maximum ricochet angle at 67 degrees. There is only 1 round in the game that I know of that has 70 degrees (130mm DM23 for the Leopard 2AX).
Thanks. Yes you're right. Seems like I am still stuck in Balance 2.0 with this one. I'll add the ricochet default angle as well to the explanation. Do you happen to know when they changed this and if there was an explanation? Regarding the HEAT shells there are no accurate ricochect/fuse failed angles afaik. But they seem to be pretty high, as the MP stuff fuses even under very high impact angles.
-
@Baron_Georg Yes my native language is german. If you have corrections I think it would be best if you send them to me by PM, so we can keep the thread clean for discussion.
-
Once again it's time for a new guide. This time it's all about the ammunition in Armored Warfare.
Keep in mind that english is not my native language, I try my best to write correct sentences. Aswell I use google translate on my original text to keep the effort a bit lower. So there might be some errors I'm missing. In this case feel free to correct me.
This guide is WIP, therefore it does not feature all ammunition types. Additionally especially regarding HE mechanics there are lots of uncertainities. If you happen to know more than me or if I got something wrong, please share your knowledge.

Content:
- Abbreviations
- How a cannon works
- Basic ammunition traits in Armored Warfare
- Kinetic Projectiles (AP)
- Shaped-Charge Projectiles (HEAT)
- High-Explosive Projectiles (HE)
- Special Ammunition: HESH/HEP/PISH
- ...
This guide is still incomplete. It is constantly being expanded with new ammunition types.
1. Abbreviations
Since there are many abbreviations regarding ammunition, I made a short list. Please note that there are usually several abbreviations and names for the same type of ammunition, but ultimately they mean the same thing. Only the most important and common abbreviations related to the game Armored Warfare are listed here.
- AP (Armor Piercing)
- APFSDS (Armor-Piercing Fin-Stabilized Discarding Sabot)
- HEAT (High Explosive Anti Tank)
- HEAT-MP (High Explosive Anti Tank Multi-Purpose)
- HE (High Explosive)
- HE-I (High Explosive Incendiary)
- HEP (High Explosive Plastic) (HEP is the American name, HESH is the British)
- HESH (High Explosive Squash Head) (British abbreviation)
- ATGM (Anti Tank Guided Missile)
- ATGM-TB (Anti Tank Guided Missile Thermobaric)
- PELE (Penetrator Enhanced Lateral Effect)
2. How a cannon works
Before we get to the ammunition, there are some important aspects in real tank technology that you should know beforehand. Each ammunition is fireed by a cannon or a launcher. Let's take a closer look at the cannons:
SpoilerGeneral function:
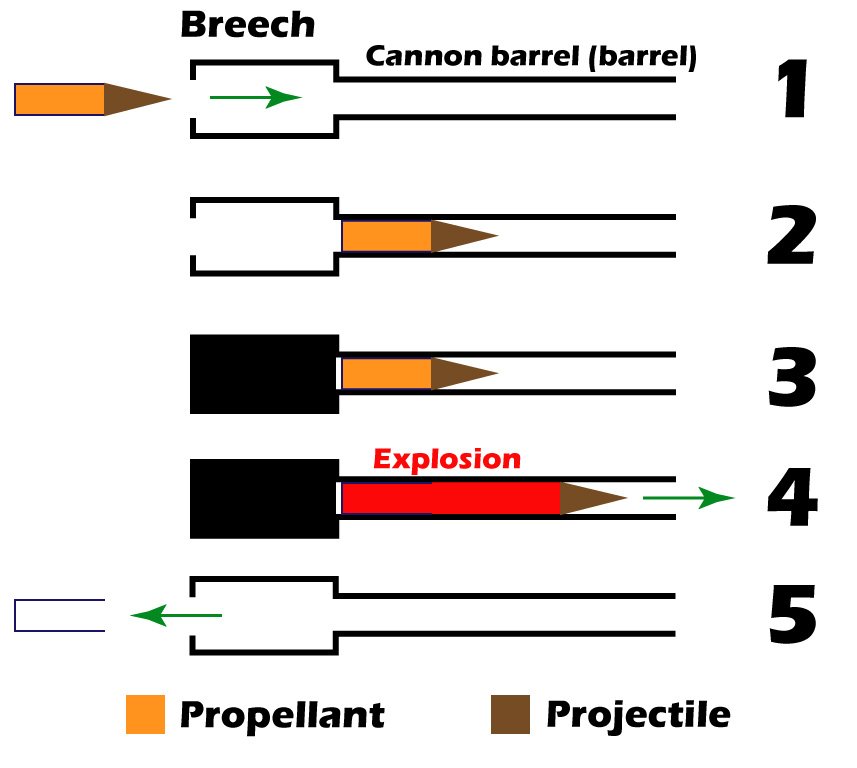
Function of the cannon Author: Thierry Kühni Link to the picture license
Simply put, a cannon consists of a breech and a gun barrel. The grenade is first loaded into the cannon through the open breech (picture above 1, 2). Then the breech is closed again gastight (picture above 3). Now the loaded grenade consists of the following 2 parts: the propellant charge and the actual projectile, which is ultimately being shot. The propellant charge is made of an explosive substance and is located behind the projectile. Once the gun is fired the propellant charge is being ignited.
Since the ignited propellant charge is now between the closed and gastight breach and the projectile in the barrel and the gas expands due to the explosion of the propellant charge, the projectile is accelerated towards the target due to the high gas pressure inside the barrel (picture above 4). As soon as the projectile has left the barrel completely, it has reached a certain speed (muzzle velocity) and thus flies in the target direction. The expanded gas in the barrel leaves the tube after the projectile, which is visible as a fireball (depending on the caliber of the cannon) when the cannon is fired.
In most cases, the breech is now opened automatically and the grenade shell (where the propellant was in) is ejected. So the next grenade can be loaded (picture above 5).
M1A1 Abrams firing the 120mm cannon. The fireball can be seen very well. Author: US Navy photo by Photographers Mate 1st Class Ted Banks Link to Image License
Types of cannons:
Rifled cannon:
The rifled cannon is no longer represented in the modern main armament of a main battle tank. However, it is used especially with older cannons, as well as cannons with a smaller caliber (e.g. auto cannons). The rifled cannon has helical groovings on the inside. Those groovings “spiral” through the entire barrel (see picture below) and give the projectile a spin as it traverses the barrel. This spin stabilizes the bullet's trajectory and improves accuracy.
A very rare sight in modern main battle tanks: the rifled cannon of the Challenger 2. Here you can see the spiral-shaped grooves very well. Author: Cpl Ross Fernie RLC - Defense Imagery Link to the picture license
Smoothbore cannon:
The smoothbore cannon forms the current state of the art in the main armament of modern main battle tanks. The smoothbore cannon has no grooves (as the name suggests) but a smooth surface compared to the rifled cannon. This of course means that the projectile does not get a spin while traversing the cannon barrel. On these projectiles, this is usually compensated for by adding stabilizing fins (FS “Fin-Stabilized”), which results in a more stable trajectory.
Special systems in tanks related to the cannon
General problems with a tank cannon are as follows:
- Recoil
- Slight bending of the pipe due to temperature differences
- Combustion gases caused by shooting the gun
- Stabilization
MRS (Muzzle Reference System):
A major problem with tank cannons is the heat when firing a shot. The barrel is strongly heated and is thus starting to slightly bend. With cannons of larger caliber, such as those found in main battle tanks, the barrel can bend slightly towards the ground after firing several rounds. Even a very slightly curved tube naturally has a negative impact on the accuracy of the projectiles.
There are several ways to prevent this: on the one hand there is the MRS, which we will take a look at here. In addition, there is also the thermal sleeve, which is described below.
The MRS allows the gunner to readjust the cannon after firing several shots without having to leave the tank. Through the adjustment, the fire control system can correct the curvature of the barrel in the calculation and thus still maintain the original accuracy.
The adjustment is made using a small mirror which is mounted at the tip of the gun barrel (see picture). The mirror reflects a point of light into the crew compartment of the turret, where the gunner sits, who can then make the adjustment based on the displacement of the reflected point of light.
The MRS mirror, which reflects the light point (On a Leopard MBT). Author: Catalan Link to the picture license
Thermal barrel sleeve:
A thermal barrel sleeve has a similar function to the MRS. It tries to prevent uneven heating or cooling of the gun barrel. As already mentioned above, uneven heating or cooling can lead to slight bends in the barrel and make the cannon less precise. The sleeve primarily protects the barrel from solar heat (sunny side warm, shady side cold) as well as wind (wind facing side cold, other side warm) or rain.
The sleeving consists of an insulating material that can be attached to the barrel with tapes or screws.
In addition to the classic thermal sleeve, there are also the rigid barrel stabilizers, which give the barrel additional stability and make it less prone to bending. Examples include the Skorpion Kastet (in Armored Warfare) or the IFV Puma.
Bore evacuator:
The bore evacuator is a very simple component that prevents the gases caused by firing the gun from entering the crew compartment after the breech has been opened. This is important because parts of these gases can be toxic or flammable and could thus negatively affect the crew in the crew compartment.
Bore evacuator of a Leopard 2A4 Author: powidl Link to image license
Muzzle brakes:
Muzzle brakes are particularly common in very large-caliber cannons (such as artillery cannons). The muzzle brake reduces the recoil of the cannon. This is achieved by redirecting the gases caused by firing the cannon (which exit the barrel) towards the vehicle. Which counters the recoil effect.
Muzzle brake on the AS-90 self propelled howitzer Created by: Pfc. Rhonda J. Roth-Cameron, U.S. Army Link to Image License
Stabilization:
Practically every modern tank cannon is stabilized by a stabilization mechanism. This means that the cannon compensates the movements of the vehicle. As an example, the cannon is aimed at a target in stabilization mode, if the driver now drives the vehicle over uneven terrain, the vehicle movements can be compensated to a certain extent with the stabilization, and the cannon can thus be kept constantly on the target. Of course, the stabilization also has its limits, which are the maximum elevation values of the cannon. In addition, there are of course technological differences that ultimately make the cannon more accurate or less accurate while driving.
The function of the stabilization can be seen very well in this video:
3. Basic ammunition traits in Armored Warfare
All traits of the ammunition description as listed in Armored Warfare are described here.
The ammunition description card is displayed in the garage when you move your cursor over the particular ammunition icon.
SpoilerSpeed (m / s):
This is the speed of the projectile. A distinction is made between the following cases:
Case Missile or ATGM:
In the case of the rocket or ATGM, the speed denotes the maximum airspeed.Since rockets first have to accelerate at launch, they do not reach the speed specified in the information window immediately, but only after a certain delay.
Case projectile:
For normal projectiles, the speed denotes the muzzle velocity of the projectile. The muzzle velocity is the speed of the projectile at the point where it leaves the muzzle of the barrel. The bullet thus reaches the specified speed almost “immediately” and is then more and more slowed down by air resistance.Impact angle (°):
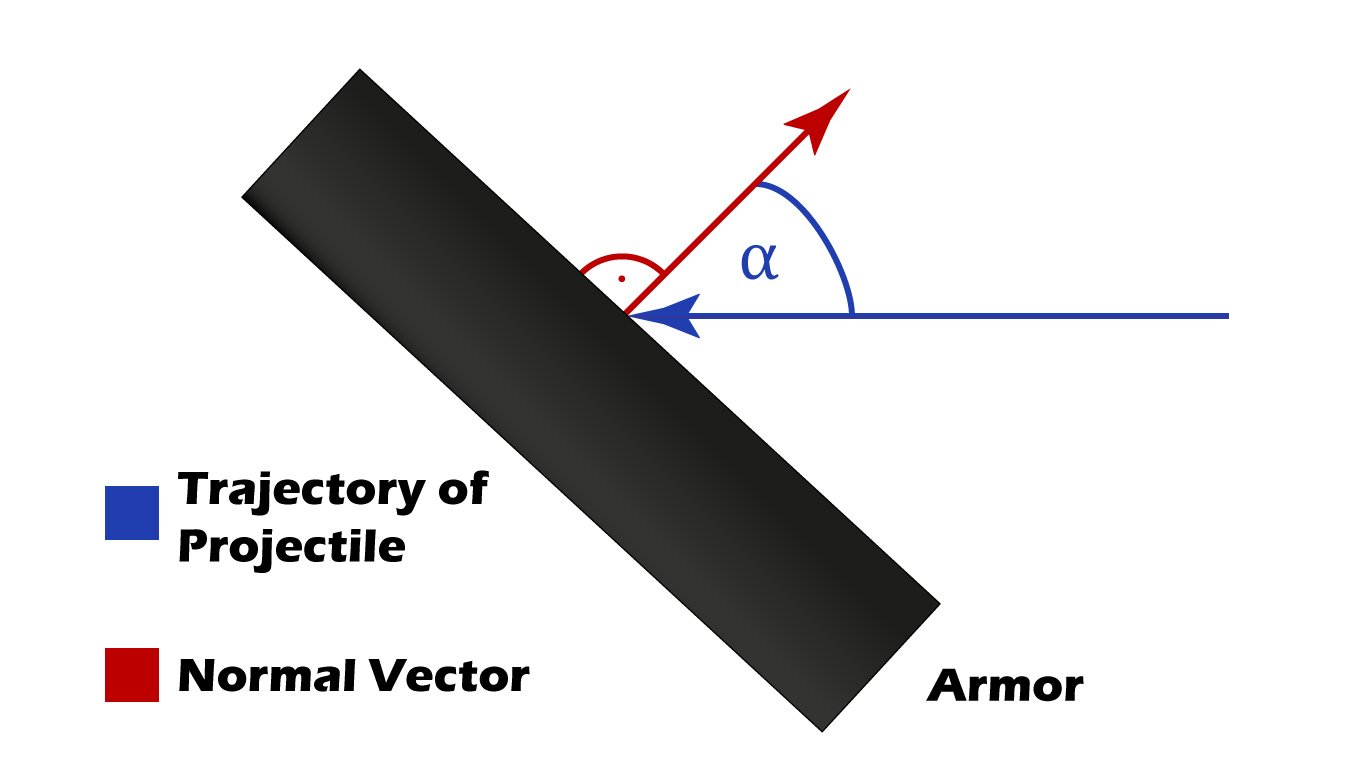
The angle of impact refers to the angle at which the fired projectile hits enemy armor. Depending on the type of ammunition, the projectile is more or less sensitive to high impact angles.
The impact angle alpha is the angle which is enclosed by the direction of the projectile and the normal vector (90 ° perpendicular to the armor) of the armor. Author: Thierry Kühni Link to the picture License
If the impact angle of the projectile is too high, it ricochets off the armor or shatters and is completely destroyed. If the projectile ricochets, it continues to fly in the changed direction and can still damage enemies. However, these projectiles have 30% less penetration.
Minimum spread (°):
Visualization of the spread cone after firing the projectile with opening angle alpha. Basically, it is a solid angle. Author: Thierry Kühni Link to the picture License
The minimum spread indicates you how accurate your projectile is when you are fully aimed (when the aiming circle is smallest). The value indicates the opening angle alpha (see picture) of the cone / solid angle. Theoretically, your projectile can land anywhere within this cone. However, in AW the shots are distributed much more closely to the center of this cone.
In general, one can say that the smaller the specified angle alpha, the more accurate the projectile is. It can also be seen that the accuracy decreases with increasing distance l.
Now you can of course also do some calculations, for example to convert the opening angle into a circle diameter D (see picture):
There are two possible solutions for this, on the one hand via the solid angle or via trigonometry:Trigonometry:
D = 2 · (tan (α / 2) · l)
Solid angle:
Ω = 2π · (1-cos (α / 2)) -> D = 2 · sqrt ((Ω · l²) / π)
Reload time (s):
There are two types of reload times in Armored Warfare:
Reload time:
A distinction is made between three cases:
In the case of a single-shot cannon:
the reload time represents the time, which must elapse from the time the shot is fired until the next shot is loaded.Case magazine-cannon:
For cannons with a magazine, the reload time represents the time that must elapse from reloading the entire magazine until a new, full magazine is loaded. There are many tanks that support partial reloading. This means that you can already reload a half-empty magazine and get a reduction in the original reloading time for a complete magazine reload.Case Ready-Rack:
The Ready-Rack is a special form of the magazine, which contains a certain capacity of shots. If a shot is fired (and the magazine still has at least 2 shots), the next shot immediately reloads with the salvo reload time. The magazine is then loaded with a single shot with the reload time, if another shot is fired during this reloading process, the reload time is reset and the next shot is loaded with the salvo reload time (if the magazine still contains at least one shot) or with the normal reload time (when the magazine is empty). If no shot is fired, the magazine is gradually filled with one shot each time the reload time elapses until it is full again.Salvo-reload:
There are also three cases of salvo reload time:
Case single-shot cannon:
There is no salvo reload time here. It is therefore not shown in the ammunition description.Case magazine cannon:
In the case of cannons with a magazine, the salvo reload time represents the time which must elapse from the firing of the cannon until the next shot is loaded from the magazine. If the magazine is empty after the shot, it will be refilled after the reload time has elapsed.Case Ready-Rack:
As already described above, the salvo reload time represents the time that must elapse from the firing of the cannon until the next shot is loaded from the magazine. If the magazine is empty afterwards, a single shot is loaded again after the reload time has elapsed.Salvo size:
This number only occurs with magazine and ready-rack cannons, as well as with multiple launchers and describes the maximum capacity of the magazine / ready-rack / launcher.
Burst fire rate (rounds/min):
The burst dire rate for magazine and ready-rack tanks is calculated from the salvo reload time. It describes roughly within one minute how quickly the tank can fire its shots from a magazine / ready rack:
Burst fire rate = 60s / salvo reload time
For machine guns and autocannons, the burst fire rate is usually displayed instead of the salvo reload time. By changing the formula, the salvo reload time can also be calculated:
Salvo reload time (in seconds) = 60s / burst fire rate (in shots / min)
Traverse speed (°/s):
This speed only occurs with guided missiles (ATGM). It describes by how much ° / s you can change the trajectory of the ATGM maximally. So it indicates how “agile” the guided missile is and how well it reacts to changes in control. Attention: This value is relative to the speed of the missile! A slower guided missile is more agile compared to a faster guided missile with the same traverse speed, since it travels less distance in one second due to the lower speed.
Self-guided:
This parameter only occurs with guided missiles (ATGM). This parameter is answered with yes or no. This is a feature that allows the missiles to be automatically guided towards the center of a target when firing at a target that is autoaimed on with a (standard) right-click. The missiles automatically fly towards the target and you can take care of other targets during the process. This feature only occurs on very few and mostly high-tier tanks.
Lock-on time (s):
This parameter only occurs with guided missiles (ATGM) with “Top-Attack” mechanics. It indicates the time it takes for an enemy vehicle to be locked on as a target for the ATGM.
4. Kinetic Projectiles (AP)
Color: blue
Typical muzzle velocity: 1000-1800m / s
Maximum impact angle: 67-70 °
Strong against: All types of armor (universally applicable) Weak against: high impact anglesThe kinetic projectiles (AP armor piercing) are a standard ammunition type for almost all vehicles because this type of ammunition can be used effectively against practically all types of armor. The penetration power is achieved purely through kinetic energy, which is why these projectiles are also referred to as KE projectiles (kinetic energy).
SpoilerBasic AP ammunition terms:
AP ammunition has a special entry in the detailed ammunition view:
Ricochet default angle (°):
This entry specifies the minimum impact angle at which the shell will ricochet.
Conventional full caliber AP projectiles:
Full caliber armour piercing kinetic projectiles are often found on low tiers in Armored Warfare (or autocannons). They are often fired by rifled cannons because the spin stabilizes these projectiles in their trajectory and makes them more accurate. In Armored Warfare, the kinetic full-caliber projectiles are characterized above all by their lower muzzle velocity (800-1200m / s) compared to sabot projectiles.
Designations:
The following designations are used for this ammunition:
AP (Armor Piercing), APC (Armor Piercing Capped), APCBC (Armor Piercing Capped Ballistic Cap), AP-I (Armor Piercing Incendiary)Design and function:
Full-caliber AP grenades are characterized by the fact that the projectile that is fired takes up the entire caliber of the cannon. Such grenades are very often fired by rifled cannons, since in most cases these projectiles are spin-stabilized. Especially for machine guns and auto cannons, which are usually rifled cannons, this is usually the standard ammunition. The shell itself consists, to put it simply, of the shell cartridge, which contains the propellant charge and the detonator. As well as the actual projectile.
A 75mm full caliber AP shell. The golden part is the shell cartridge, the black and white part the actual projectile. Author: Banznerfahrer Link to the picture license
The effect on the target is based entirely on the kinetic energy of the projectile. The projectile is made of a high density material. Due to the high speed of the projectile, an enormous amount of pressure and thus heat is created on impact. The result is that the projectile "eats" through the armor and looses energy. In the event of penetration, the projectile, as well as armor spall and molten metal, shoots into the enemy tank's crew compartment area and thus destroys it.
Effect in Armored Warfare:
Same as sabot projectiles (see below).
Use in Armored Warfare:
Same as sabot projectiles (see below).
Sabot projectiles:
Sabot projectiles are now the norm in modern tank cannons because they offer several advantages over conventional full-caliber AP bullets, such as a higher muzzle velocity. These shells are often fired from smoothbore cannons (high caliber) but also with rifled cannons (auto cannons).
Designations:
The following designations are used for this ammunition:
AP (Armor-Piercing), sabot , APDS (Armor-Piercing Discarding Sabot), APFSDS (Armor-Piercing Fin-Stabilized Discarding Sabot), Sabot (sabot), KE (Kinetic Energy) , AP-I (Armor-Piercing Incendiary)Design and function:
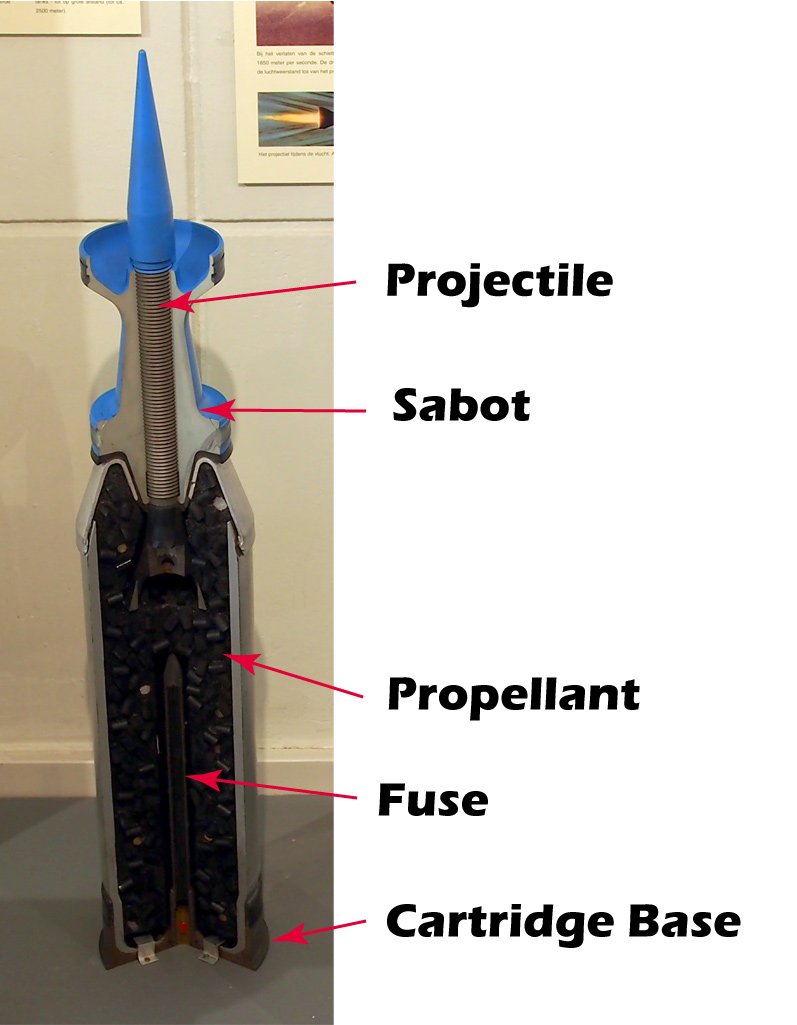
sabot projectiles are constructed like normal grenades. The difference is that in this case the penetrator has a smaller caliber than the shell itself. As you can see in the picture below, the penetrator is an “arrow”, which consists of very high density material such as tungsten carbide or depleted uranium . Since the penetrator would not be stabilized within the barrel due to the smaller caliber and the explosion of the propellant charge would have no effect (since the penetrator does not seal the barrel), a sabot must be used (hence the term sabot projectiles). The sabot envelops the penetrator and is attached to it. It seals the barrel and guides the penetrator through the barrel.
The sabot is very important, since it can have a major impact on precision. Ideally, the sabot detaches from the penetrator due to the higher air resistance after they have left the barrel. This must happen symmetrically and as quickly as possible so as not to impair the precision.
As with a normal grenade, we have a shell cartridge in which the propellant charge is located. This is usually ignited electrically by the igniter, which is connected to the bottom of the cartridge. The cartridge base is made of a metal and, in modern shells, together wit h the igniter, is the only leftover of the shell after the shot has been fired. Above all, this has the advantage that with large bullets the remains of the bullets in the case do not take up so much space.
The construction of a 120mm APFSDS shell. (Image changed) Author: Alf van Beem Link to image license
The effect of the penetrator is based purely on kinetic energy. If the penetrator hits the enemy armor at a very high speed, it cannot deform quickly enough due to the inertia of the material to reduce the energy of the penetrator. The penetrator therefore penetrates the armor and is gradually decellerated. Because this process causes enormous heat and pressure, the armor liquefies. As soon as it is penetrated, this partially melted material with armor spall reaches the crew compartment of the opposing vehicle, which is set on fire or completely destroyed by the spall effect and high heat.
Effect in Armored Warfare:
Armor piercing sabots as well as full caliber shells use the same mechanics in Armored Warfare.
Damage:
The damage of these projectiles varies only in a small amount compared to the other types of shells, so the damage is consistent when penetrating. Most AP shells have no module damage bonus. Exceptions to this are shells with a penetrator made of depleted uranium, which grant a 25% bonus to module damage (this ammunition is represented on the higher tiers).Penetration:
AP ammunition generally has a very high penetration, but HEAT warheads generally outperform it. Since the AP ammunition works with kinetic energy and the projectile is slowed down by the air resistance on the way to the enemy, this ammunition loses its penetration at a distance.Impact angle:
AP ammunition is generally not susceptible to any protective measure. Only thick armor and high impact angles can make the projectiles harmless. The AP shells ricochet from an impact angle of 67 ° (standard) to 70 ° (Leopard 2AX). The default ricochet angle of the shell is written within the detailed ammunition info card under the entry "Ricochet default angle".To avoid having very lightly armored vehicles ricochet high caliber shells at high impact angles there is the overmatch mechanic. There is no detailed explanation to it, but it depends on the caliber of the shell, as well as on the armor of the hit vehicle. If the armor is thin enough and the shell caliber is high enough the overmatch mechanic is triggered allowing such shells to penetrate the armor even at extreme impact angles.
If a projectile hits armor at an impact angle greater than their "Ricochet default angle" and the armor is not thin enough to trigger the overmatch mechanics but thin enough to theoretically gurantee penetration of the shell the chance of the shell to ricochet is as follows:
ricochet chance = ( (impact angle - ricochet default angle) / 6 ) * 100%
Therefore, in case you hit armor at an angle of 75° (With ammo with a ricochet default angle of 67°) without triggering the overmatch mechanics, but still with enough penetration to penetrate the armor at this impact angle the chance of the shell to ricochet is as follows:
ricochet chance = ( (75°-67°) / 6 ) * 100% = 133% --> 100% Shell will ricochet (0% chance to penetrate)
Precision:
The AP shells are generally the most precise shells in the game, this is also supported by the high muzzle velocity, which simplifies hits over long distances. In general, one can say that the AP projectiles become more precise with the tier level.Use in Armored Warfare:
In Armored Warfare, AP ammunition is the standard ammunition and can be fired from almost all cannons. Since AP ammunition is effective against practically all types of armor and has very few weaknesses, it can be used in many situations.
As a general rule of thumb, you should use AP ammunition against very well-armored targets. Especially if the targets have good protection against HEAT warheads (cage armor, ERA, etc.). Since in the lower tiers 1-5, rather few vehicles have effective HEAT protection, and HEAT generally has more damage and penetration, it makes sense in many cases to prefer HEAT ammunition. Nevertheless, you should always have AP ammunition with you, as the HEAT grenades generally have poorer accuracy and lower muzzle velocity and are therefore only of limited use over long distances. Since there are also tanks that are well equipped against HEAT, I suggest to always have AP ammunition with you.
On the higher tiers (Tier 5-10) this situation changes increasingly. The tanks on these levels are increasingly better protected against HEAT. In addition, many AP grenades come close to the penetration performance of the alternative HEAT grenades. As a result, AP ammunition is increasingly represented as the standard on these tiers, since it is practically immune to these protective measures and does not lose a great deal of penetration when hit at such a point. Exception is the PVE mode where skilled players usually use HEAT to get a better damage output.
Because AP ammunition is weak to high impact angles, some tanks with strong armor angulation may be more vulnerable other types of ammunition such as HESH or thermobaric warheads. However, these are rather uncommon cases, such as the Object 279, which is extremely vulnerable to HESH, or the Merkavas, which are weak against thermobaric warheads.
5. Shaped Charge Projectiles (HEAT)
Color: red
Typical muzzle velocity: 700-1400m / s
Maximum angle of impact: 65-80 °
Strong against: All types of armor without protection against HEAT, particularly weak armor Weak against: high angle of impact, cage armor, composite armor, ERA, NERA, spaced armorThe shaped charge shells, hereinafter referred to as HEAT (HEAT for “High Explosive Anti Tank”), are standard ammunition for almost all vehicles because this type of ammunition, like AP, can be used effectively against many types of armor. The armor piercing effect is achieved by the shaped charge (hollow charge) and therefore does not work with kinetic energy.
SpoilerBasic HEAT ammunition terms:
HEAT ammunition has a special entry in the detailed ammunition view:
Max. Damage Bonus (%):
This entry specifies the maximum damage bonus of the HEAT shell based on the penetrated armor thickness. More on this in the paragraph “Effect in Armored Warfare”.
Full caliber HEAT shells:
In Armored Warfare, full-caliber HEAT shells are common on almost all tiers. They are fired by rifled cannons as well as smoothbore cannons. In Armored Warfare, the HEAT full-caliber shells are characterized above all by their lower muzzle velocity (700-1100m / s) compared to AP shells.
Designations:
The following designations are used for this ammunition:
HEAT (High Explosive Anti Tank)Design and function:
Full-caliber HEAT shells are not only fired by rifled cannons, but also quite often by smoothbore cannons. The HEAT warhead is much heavier than a modern kinetic penetrator, due to the explosives in the warhead and the general structure. If the projectile is fired by a smoothbore cannon, it is stabilized by stabilizing fins. For the function of the shell cartridge and propellant charge see section AP ammunition.
The warhead on the left after being fired. In the middle the complete 120mm HEAT-FS shell. On the right the 120mm APFSDS shell for comparison. Author: Manniman2 Link to the picture License
The shaped charge warhead is constructed as follows:
Cross section of a HEAT warhead. (Picture edited) Author: Manniman2 Link to picture license
The picture above shows the design of a shaped charge warhead. The name "hollow charge" comes from the hollow cavity inside the warhead, which is formed by the metal cone. The explosive charge is located behind the metal cone. The warhead has an impact sensor at the front tip. This sensor is connected to the fuse, which is located behind the explosive charge and ignites it when the shell hits a target. Depending on the HEAT shell, there are also time fuses. Those are usuually set before firing. The projectile is stabilized during flight by the stabilizing fins.
The explosive charge is detonated when it hits the target. The explosion liquifies the metal cone and forms a jet in the middle of the cavity due to the geometry of the cone. This jet of liquid metal now shoots towards the enemy armor at a speed of approx. 8km / s. The enormously high speed creates enormous pressure on the armor when the jet strikes it. The jet now behaves like a liquid due to the high pressure and penetrates the armor. When the armor has been penetrated, a hot metal jet and armor spall form inside the crew compartment, which sets the target on fire or completely destroy it.
The long distance between the impact sensor and the metal cone ensures that the jet can fully form in the explosion before hitting the armor. Heat projectiles which are spin-stabilized (rifled cannons) have a reduced penetration force due to the spin, since the jet “widens” due to the rotation and thus loses penetration performance.Effect in Armored Warfare:
HEAT warheads work as follows:
Damage:
HEAT shell damage varies considerably more than AP shell damage. The damage to a vehicle that is hit with HEAT strongly depends on how strong the armor is against HEAT at this point. In general, the weaker the armor, the higher the damage and vice versa.
Thus, HEAT usually causes more damage when compared to comparable AP ammunition, but is correspondingly less reliable against different armor types. The HEAT module damage is 25%. The fire bonus 300%. Therefore, HEAT causes much more module damage and fire than AP ammunition.Damage depends on penetrated armor thickness, because HEAT has a damage bonus multiplier. This multiplier scales based on the remaining penetration of the HEAT warhead. The maximum bonus in % is described in the detailed ammunition view, as already described above under the entry “Max. Damage Bonus ”.
The bonus is therefore the greater, the thinner the armor is against HEAT at the spot where it was hit. If the HEAT shell still has over 80% of its penetration value remaining after penetration, the grenade receives the maximum damage bonus. All values that are below the 80% are scaled linearly.Example: HEAT with 500mm penetration and max. Damage bonus of 25% hits tanks with 40mm armor against HEAT: remaining penetration in% = ((500mm - 40mm) / 500mm) · 100% = 92% -> This means that the remaining penetration is greater than 80%. In this case, the calculated damage is increased by 25%
Attention: The damage bonus is already included in the described damage of a HEAT shell. So you can not cause more damage than is specified in the detailed view. Normal HEAT warheads have a maximum damage bonus of 25%, but HEAT-MP warheads have 35%.
Penetration:
The penetration of HEAT is generally higher than AP ammunition. Since HEAT does not work with kinetic energy, the penetration does not depend on the distance to the target and always remains the same.Impact angle:
HEAT shells fail to fuse from an impact angle of 65 ° (older shells) to 80 ° (modern shells) and thus remain ineffective. In general, one can say that HEAT shells are a little more sensitive to high impact angles compared to AP shells. The penetration of HEAT also decreases a lot more, the larger the angle of impact is compared to AP.Precision:
HEAT shells usually have a lower muzzle velocity than AP shells. In addition, the HEAT warheads are heavier than the AP penetrators. HEAT shells are therefore generally less accurate than comparable AP shells. Since the muzzle velocity is also rather slow in most cases, it is usually harder to hit targets at long distances.Use in Armored Warfare:
HEAT shells are often used as standard ammunition, especially in the lower tiers up to Tier 5. In these tier levels, only a few tanks have effective measures against HEAT. Since HEAT generally has a higher penetration and damage potential, it is often preferred to AP ammunition there.
In the higher tiers, this situation changes increasingly, since using HEAT now increasingly requires skill, precisely because the tanks have very good protective mechanisms against them. This does not mean that HEAT is useless at these levels. However, the player should know where the opponent's strong armor is located, and how it behaves against HEAT. In these tiers, HEAT is increasingly used against rather poorly armored vehicles such as AFVs TDs or LTs. The use of HEAT also varies greatly depending on the playstyle of the respective player. Those who often flank their opponents will use HEAT ammunition more often (since the protective mechanisms and armor are weaker there) than someone who confronts the opponents head-on. In a PVE point of view experienced players often prefer to use HEAT, because they know the weakspots of their enemies. In PVP it is generally a bit harder to generally use HEAT, as AP is usually much more reliable against human players.
Tier 9 and 10 in particular have many tanks that use very potent HEAT-MP ammunition. These should not be underestimated. A K21-XC8 or large-caliber cannons can cause devastating damage with HEAT when used correctly.
Generally speaking, this means that HEAT is less reliable than AP, but does more damage if it penetrates. It is therefore always important to consider whether it is worth shooting HEAT at the target or whether it is better to use AP.
HEAT sabot projectiles:
HEAT shells with sabots are among the most modern types of HEAT ammunition. They are fired from smoothbore cannons. In Armored Warfare you will see these types of shells from tier 8-10. Due to the sabot, the shells get a higher muzzle velocity (1000-1400m / s) and thus already come close to the AP shells. The increased muzzle velocity also increases the accuracy.
Designations:
The following designations are used for this ammunition: See above.Design and function:
For the detailed function of a sabot, see the AP Ammunition section .
For the function of the HEAT warhead, see above.
Effect in Armored Warfare:
Same as full caliber HEAT shells (see above)
Use in Armored Warfare:
Same as full caliber HEAT shells (see above)
HEAT multi-purpose and tandem warheads:
Multi-purpose HEAT shells are characterized by an improved effect against infantry or other soft targets. This is achieved, for example, by an improved spall effect or a time fuse. In Armored Warfare, HEAT-MP shells act like HE shells when they fail to penetrate.
HEAT tandem shells are found in very modern ammunition mainly in ATGM warheads. They have two shaped charges and were designed to defeat ERA (Explosive Reactive Armor) armor.Designations:
The following designations are used for this ammunition:
HEAT-MP (High Explosive Anti Tank Multipurpose), HEAT Tandem (High Explosive Anti Tank Tandem warhead with 2 shaped charges)Design and function:
HEAT MP:
Same as HEAT, except for very small modifications.HEAT tandem:
The tandem warheads have 2 shaped charges. Due to its mode of action, it is very strong against ERA armor, which is actually intended to render HEAT shells ineffective. In the event of a hit, the smaller front shaped charge explodes first in order to explode the ERA plate at the point of impact. Then a larger second shaped charge explodes, which penetrates the actual armor beneath the ERA. Since the first shaped charge detonates the ERA plate at the point of impact, the ERA plate has no effect against the second shaped charge at the very same location. This allows it to penetrate the armor without being defeated by ERA. Tandem warheads can only make ERA ineffective, but not NERA (Non-Explosive Reactive Armor),For the general function of the HEAT warhead, see above.
Effect in Armored Warfare:
HEAT MP:
The basic functions are the same as HEAT, but the HEAT-MP warhead works like HE in case of non-penetration. Thus, the HEAT-MP warhead does damage even if it does not penetrate. This is approx. (Depending on the point of impact) 0-300dmgHEAT Tandem:
The basic function is the same as HEAT, but a HEAT tandem warhead cannot be completely destroyed by ERA. When impacting ERA, tandem warheads only decrease the modifier of ERA armor against HEAT (rather than destroying it), which means that armor is generally worse against tandem warheads than against normal HEAT. In general, one can assume the following as a basic rule: a penetration is almost certain against light ERA, mediocre with medium ERA and almost impossible with heavy ERA. Of course, the remaining armor thickness after the ERA plates must also be taken into account.Use in Armored Warfare:
Same as HEAT.
6. High Explosive Shells (HE)
Color: orange
Typical muzzle velocity: 300-1200m / s
Maximum angle of impact: none
Strong against: very weak armor, high angle of impact, homogenous armor Weak against: strong armor, cage armor, spaced armor, composite armorThe high-explosive shells are a standard ammunition type in many vehicles. The penetration is not achieved by kinetic energy, but by the explosion of the explosive that resides in the warhead.
SpoilerWarning: Since the HE mechanics in the game are very complex, with only rudimentary and outdated information available, not everything in this section regarding the game mechanics is necessarily correct. The information was compiled and tested to the best of my game knowledge.
Basic HE ammunition terms:
HE ammunition has two special entries in the detailed ammunition view:
Splash radius (m):
This entry describes the radius around the impact point of the HE grenade in which the grenade can cause damage to a vehicle. This damage is also called “Splash Damage” in Armored Warfare
Splash penetration (mm):
This value indicates how much penetration the HE grenade maintains in the case of a splash hit.
Full caliber HE shells:
Since the majority of all HE shelles are full-caliber shells, we limit ourselves to this type of shell. In general, this type of shell, like HEAT, does not work with kinetic energy, but generates the penetration force using the explosives inside the warhead.
Designations:
The following designations are used for this ammunition:
HE (High Explosive), HE-I (High Explosive Incendiary)Design and function:
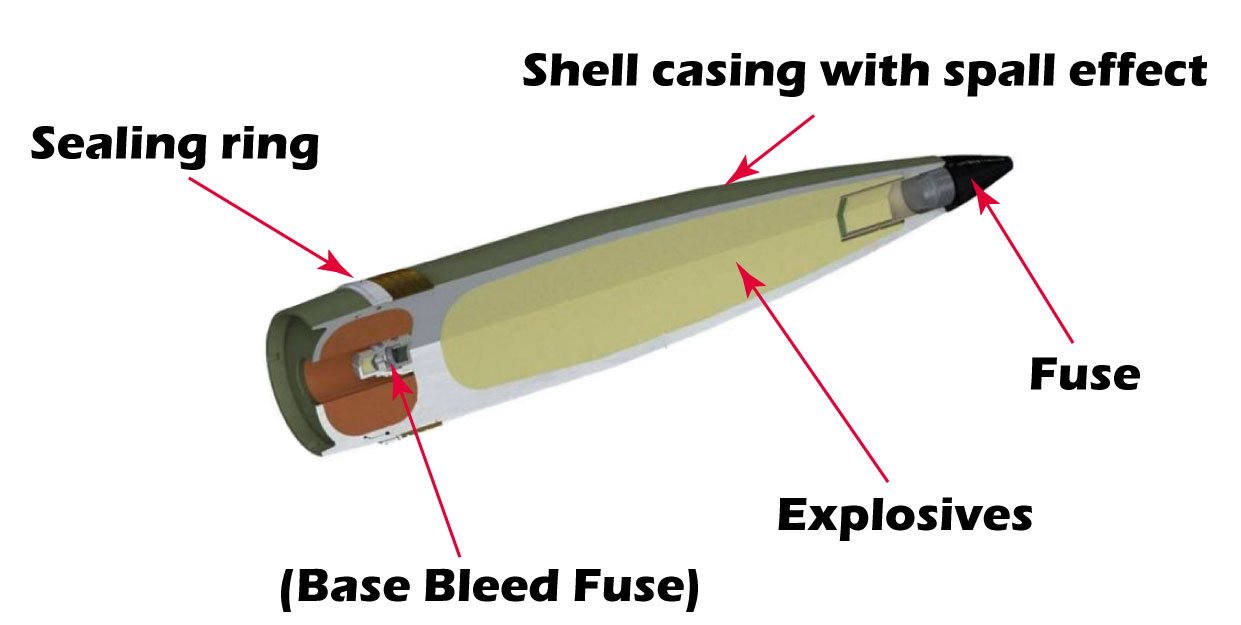
The general design of a HE warhead is relatively simple. Dirst of all, we have the fuse, this can be a time or impact fuse that ignites the explosive charge. This causes the explosion, which breaks the shell casing into multiple splinters and thus achieves the highest possible spall effect. The sealing ring seals the projectile against the barrel, that no gas can escape in between when she shell is being fired. There are many variations of HE-Shells and differences in design, depending on the gun and use-case.
A 155mm HE warhead, which is fired from the M109 self-propelled howitzer. The "base bleed" construction only occurs on some artillery shells to increase the range. Author: Mr. Ductri Nguyen Link to the picture License
Effect in Armored Warfare:
Damage:
The damage of the HE shell varies enormously depending on the armor strength against HE. The HE grenade also forms a “splash-sphere” with the diameter of the “splash radius” attribute in the detailed view of the shell. Everything that intercepts with this sphere can be damaged. With such an indirect hit (splash hit), the grenade only has the penetration, which is indicated in the detailed view attribute “Splash penetration”. In general, the damage from a splash hit is greatly reduced compared to a direct hit. If a vehicle is within the splash radius, the value of the vehicle armor which is within the sphere is averaged. If the penetration of the grenade (attribute “Splash penetration”) is higher than the average armor value of the vehicle, the grenade causes damage to the vehicle. If the calculated damage in this case is greater than 33% of the average shell damage, the damage is limited to this 33%. Therefore, splash damage generally does less damage than a direct hit.This means, for example, that you can shoot the HE shell under a vehicle hull in close combat and cause damage, since the bottom of the hull is relatively weakly armored in almost all vehicles.
There are two options for a direct hit:
1. The point of impact is weaker or only slightly better armored against HE than the specified penetration value of the HE shell: The shell does damage within the specified damage of the shell. The weaker the armor, the greater the damage.
2. The point of impact is armored much better against HE than the penetration value of the HE shell: the shell does minimal damage that ranges between 0 and the minimally indicated damage of the HE shell. Here aswell the damage becomes smaller (up to zero damage) the stronger the armor is.HE has the highest module damage bonus. In addition, like HEAT, HE has a fire damage bonus. However, with only 100% it is lower than HEAT.
Penetration:
The penetration of HE shells is generally relatively low and depends heavily on the caliber (larger caliber = more explosives = more penetration). The warhead does not work with kinetic energy. Therefore the penetration values are constant and not dependent on the distance.Impact angle:
HE shells do not have a ricochet angle, this means that they only ricochet from an impact angle of 90 °. So HE is also good for shooting against heavily angled armor.Precision:
Since HE shells are relatively heavy, they have a low muzzle velocity. This makes them one of the most inaccurate shells in Armored Warfare. Accordingly, these shells are difficult to use over long distances.Use in Armored Warfare:
HE shells are rather specialized shells and are rarely used (except for artillery). Since the penetration values are higher the larger the caliber of the shell is, there are special tanks like the Sheridan (152mm cannon) which can use HE as main ammunition. However, these are rather exceptions. Generally, HE is used in the following situations:
- The enemy is very well armored and there is no way to cause damage with other ammunition types
- The enemy is very poorly armored and vulnerable to HE
The first situation can be used very well to take heavily armored targets with few remaining HP out of the game. Because HE can cause damage even if the grenade does not penetrate. The second situation can be used depending on the battle situation. The damage to poorly armored targets is enormous with HE. In addition, you cause enormous module and crew damage, which in turn leads to fire and a big handicap for the opponent. HE can therefore be used against AFVs. Nevertheless, you should also be aware that HE has poor accuracy and a rather slow muzzle velocity which makes it not a good option for long range shots.
In general, HE can be used if you have no other way of damaging your enemy. In addition, with the high fire damage bonus you can quickly start a fire if you can shoot the enemy in the rear part of the vehicle.
That's all for today, I'll try to add more ammo
as well as translated picturesASAPChanges:
Spoiler- Corrected ricochet angle of AP ammunitions, added explanation for the info card entry "default ricochet angle" thanks to Katsumoto & Qbicle :)
- Added HE shell
- Added translated 155mm HE shell picture
-
 8
8
-
It looks like they have learnt from the CATTB disaster. This one actually sounds balanced at first sight and does not carry any incredibly stupid/broken ability. I guess that pen indicator is a nice to have feature but won't break the game. Looks like a fun to play tank. But probably not for the frontline. I actually prefer if they introduce it a bit too weak at the start and then buff it if it is not competitive. Definitely better for their image.
-
Nice! Always wanted to fight for the Lions of Nequiel :D
-
The AFT10 is great and actually useful in all modes. That's actually the reason why I grind this line to get to the Hellfire.
Regarding the Griffin 50mm it seems to be a vehicle that benefits drastically from people who know what to do (at least in PVP). I've seen lots of players perform bad in it, hence why it never really catched my eye until now. So it really seems to be more dependent on the player than an average vehicle.
I already gave feedback on this so let's see what happens. Either way I'll just keep enjoying this vehicle in order to get the mighty Hellfire and punish some players.
-
I'm just speaking for myself here. But let me place my opinion about this topic as a fairly decent AW player.
Just fyi I'm running AWtactics, a german website dedicated to help players become better/understand the game mechanics better. Therefore I'm writing lots of guides and recording/commenting my gameplay videos.
Nobody starts as a master in any game:
I started with WOT back in 2012 and in the beginning did not really care about game mechanics, tactics and whatnot. So I was what you would call an average/sub average player for some time. When getting to know the game more and more I wanted to get better.

I tested various stuff from reading forum guides to joining Clans/Platooning. The forum guides are great in explaining the various game-mechanics and how they work (which is a crucial thing to understand if you want to improve) but they can't really show you how to actually play. For this purpose I joined Clans and teamed up in Platoons. While this certainly helps to improve some of your skillset it did not really had a very strong effect on myself as a player.
So what helped me the most back then, you may ask?
Videos and Livestreams of very good players (Clanwars of top clans, Tournaments, ...) this way I could actually "see through the eyes" of someone who is good at the game. I could observe how they react to certain situations, which spots they use, how they make armor work. Simply put: How they play the game.
So what I did is observe carefully and then try to apply this to my tactics. With time and exercise there was a significant improvement and I went from average to a good player fairly quick.Now what is the difference between videos and platooning up with decent players?
In my opinion there is one big difference and that's why I personally think videos are better. While you're in a platoon you can certainly get a better winrate and see where the player goes and how he reacts to certain situations. However, keep in mind that you're distracted while in battle so you can't just sit there and observe the nice plays of your platoon-mate. In videos you have a first-person view and can see the very same the player sees at the moment. In my opinion this is a big and meaningful difference. You just can't learn the small details of wiggling your armor, hiding your weakspots... by playing in a platoon. You need to see when a player uses such tactics and then understand why he did that at this particular time. This is something that's very hard to achieve while in battle in my opinion. (Humans simply can't multitask that good)
Why are there little to no players who want to platoon for this purpose?
There certainly are people who would do this. But I think noone wants to actually explain you every little detail about what you should do in this moment to be successful. Those people are playing as well so their brain is already being used. So in this situation it is very hard to play and then additionally give meaningful advice. At least I would struggle doing so.
Secondly there is lots of stuff nobody can explain to you/show you while in a Platoon/Battle:
Stuff like where to aim, what ammo you should use right now, if you should use smoke or just retreat, if you should go for the blindshot, ... There are lots of things we clearly can't tell when in battle without seeing what you see. Yes you could just stick together the whole game, which is possible while driving MBTs, but otherwise not always the best option in a battle.Other than that it as well requires patience. Not everyone wants to put so much effort into that. But I believe if you're able to join a Battalion ther are definitely players you can learn from while platooning. I just don't think that it's the best way because it lacks some "insights".
What makes a good player "good":
For me there is only one answer: Situational awareness
If you master this one you're set to dominate
What do I mean by "situational awareness":
- You know exactly what the enemy does. Same goes for your team. And use it to your advantage
- You know your surroundings (you know the maps, you know where to take cover, you know where the nearest cover is at all time)
- You use the minimap to your advantage (If you happen to get rushed you've done something wrong, if you get wrecked within seconds you usually failed too reading the minimap)
- You know the game-mechanics and how to use them to your advantage
- You react fast to any changes during the battle and adapt accordingly to gain maximum advantage
- You take your chances if the enemy happens to provide them
I think I forgot half of it but in the end it's all about knowing in advance what the enemy and your team is going to do and adapt accordingly. You don't need those "aiming skills". All you need in this game is to use the actions of your enemies and team to your advantage. This is something you can't learn by platooning. Yes your platoonmate could tell you what you should do now but in the end you need to realize this yourself and draw your own conclusion in order to be successful as a solo player aswell. While watching videos you see the very same situation as the player and can thus start to analyze the battle yourself and see if you're right with your predictions and observations. This can be very valuable.
In my opinion you learn this best if you watch videos/livestreams and then try to adapt such details for your own gameplay. Secondly learn out of your failures and carefully observe how enemies/friendlies react to certain situations to use it to your advantage in the future games. So in the end experience as well helps a great deal if you just keep trying out new stuff and learning out of your failures.
What I want to add as well and this is very important in my opnion: There is no "right" playstyle. I personally like a very offensive playstyle but there are lots of other players who have way different playstyles and are successful as well - Remember you're not trying to copy someones playstyle but trying to improve your own playstyle by using the tactics you like and tactics that work for you.
-
5


_%26_105mm_Armour_Piercing_Fin_Stabilised_Discarding_Sabot_-_Tracer_APFSDS-T.JPG)
Spirithaven BP Preview
in Upcoming Changes Discussion
Posted
Yes was fun
Yes that's probably the case. It's definitely not easy to play. I'm sure this thing will get changed before the release and it only depends on wether the devs actually listen to feedback and to whose feedback as well, as there are multiple different opinions about it. One thing is for sure. It simply can't be balanced to make all modes equally happy.
I like vehicles that are hard to play so I automatically liked the Pindad in PVE. However it seems to me that AW is trying to head towards the opposite direction of making everything as easy as possible. What I want to avoid for this BP is to have them release a way too strong prem and then nerf it again. It's better to buff it later. Otherwise folks with pitchforks'll flood the discord
Haha wasn't probably performing well in this one either. Considering I failed horribly in raiding party